Deploying a PayloadCMS App on Coolify
Learn in this guide how to deploy a PayloadCMS app on Coolify. From preparation, through configuration, to the final deployment.
PayloadCMS is a powerful, flexible headless CMS based on Node.js, ideal for custom projects. As an example: this website itself uses PayloadCMS as a backend to manage content dynamically and efficiently.
Coolify, a platform for deploying web applications and various other services, takes care of all infrastructure management for you. In this post, I will show you step by step how I host my Payload apps on Coolify. I will go into detail on all the necessary steps, from preparing the app and setting up the required services to the final deployment.
The combination of PayloadCMS and Coolify gives you the perfect foundation to develop and run robust, scalable applications without having to deal with complicated infrastructure.
Prerequisites
Make sure you meet the following requirements:
- Coolify 4 Installation: You need an already running server with Coolify 4 installed. An example could be a server from Hetzner. If you haven't set up Coolify 4 yet, you can use the official Coolify setup guide to complete the installation.
- Basic knowledge of Node.js: Since PayloadCMS is based on Node.js, you should be familiar with the basics of Node.js and the package manager of your choice (I recommend pnpm).
- GitHub Repo: Your Payload app should be hosted in a GitHub repository, as Coolify will use this for deployment.
- Domain and SSL: Optional but recommended — having your own domain and setting up SSL certificates for your application.
Once these prerequisites are met, you can start preparing your app and deploying it on Coolify.
Before Deploying on Coolify
Before you start deploying on Coolify, you need to make sure you have a fully functional PayloadCMS app. This post focuses on how to deploy that app on Coolify. If you haven't created a PayloadCMS app yet, I recommend first consulting the official PayloadCMS documentation and setting up an app.
Your app should build cleanly locally, and the production build should start without errors. It is essential that you resolve all potential issues locally first, as this significantly simplifies the deployment process and avoids later complications on the server.
Once your app is running smoothly locally and hosted on a GitHub repo, you can proceed with the next steps and prepare the deployment on Coolify.
Setting Up in Coolify
Setting up in Coolify is actually relatively straightforward. Here is the process as I carry it out:
Project in Coolify
Open your Coolify instance in the browser and navigate to "Projects" — if none exists yet, create one.
Click on the "production" button and then on "+ Add Resource". Under "Applications", choose your preferred variant. Since I have connected the Coolify instance used here via GitHub Apps, I will also choose that variant. (Connecting via GitHub Apps is possible under the "Sources" menu item).
Select the GitHub App, search for the desired GitHub repo from the dropdown list and click "Load repository". Then make the appropriate settings and click "Continue".
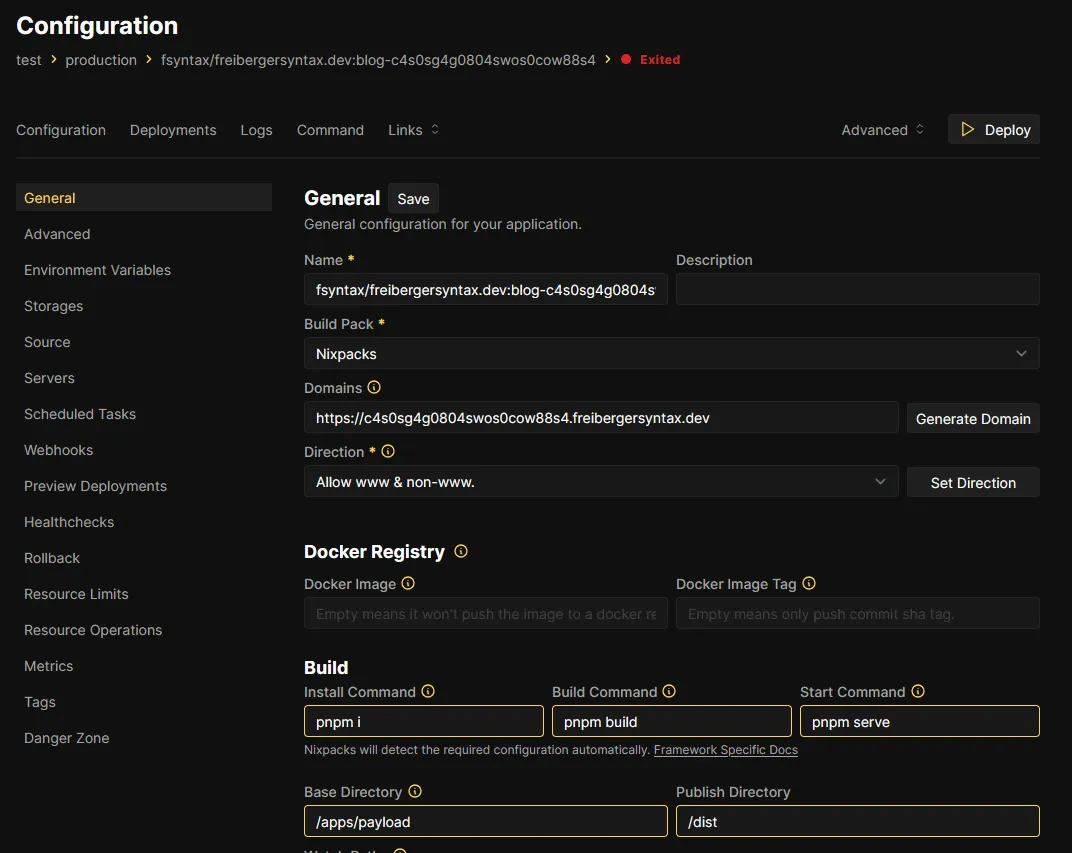
App Configuration
Here you configure the Payload app. You can give it a recognizable name, add a description, and specify a custom URL. The most important part here, however, is the Build section.
- Commands: Depending on which build/start scripts are defined in your
package.json, you need to enter these correctly here. - Base Directory: This is individual. Since I'm using a monorepo here and the Payload app is located in a subdirectory, I enter the corresponding path here.
- Publish Directory: This should be the directory with your production build, in my case
/dist.
For illustration:
Database
No database, no Payload app — so we will create a DB directly in Coolify and connect it to the app via a Connection String. We navigate back to Projects -> Your Project -> production (or the environment where the Payload app is located).
Click "+ New" under Resources, select your preferred DB (PostgreSQL or MongoDB) and click "Start". Easy as that!
Under the Network section, copy the Connection String (Postgres URL) — you will add it as an ENV variable in the Payload app shortly.
Setting Environment Variables
Navigate back to the configuration of your Payload app. In the sidebar, click on Environment Variables and add all the variables your Payload app needs.
Important: The checkbox for "Build Variable?" should be checked. If you used the Developer View to manage your ENV variables, you need to switch back to Normal View and check the checkbox!
Persistent Media Uploads
If you've followed all the steps so far, you are basically ready to deploy the app. Here is one more tip, in case you use media uploads in your Payload app.
To prevent your uploads from being lost between deployments, navigate to Storages, directly under the Environment Variables section.
Click "+ Add", under Volume Mount enter a name and a Destination Path. In my case, the upload directory (/media) is in the root of the Payload app. Note: /app/ is the root of the Docker container in which the app runs.

Deploying the App on Coolify
Now we can (try to) deploy the Payload app. To do this, simply click "Deploy". You will be automatically redirected to the deployment page and can watch the entire process. To see more information about the deployment, I recommend clicking "Show Debug Logs".
If an error occurs during deployment, you can use this to identify and fix the cause.
Conclusion
With this guide, you have now learned the most important steps to successfully deploy a PayloadCMS app on Coolify. The combination of these two powerful tools allows you to manage and scale complex web applications with minimal effort. Coolify takes the burden of infrastructure management off your shoulders, while PayloadCMS gives you maximum flexibility in creating and managing content.
Once you've set up this process, you can carry out future deployments of your app quickly and easily. This means your application is not only online fast, but also securely and reliably hosted.
I hope this post has helped you and that you now have a better understanding of how to deploy your PayloadCMS app on Coolify.
Good luck with deployment and developing your projects!